Displaying Text
Hello again for the second "official" tutorial for Easy2D. This time, we will create a bitmap font and write some text with it on the screen. Once again, follow the links for the classes and methods on this example to check their full documentation.The code for this tutorial can be found in the \examples\displaytext directory of the Easy2D distribution.
Before we begin, we need a bitmap font. Download F2IBuilder (f2ibuilder.sourceforge.net) and create a bitmap font with it. Using it is pretty straightforward, and in the end you shall have two files: one of them being an image file, and the other a .dat file. If you're having problems generating a good image, try unchecking the "Use Alpha" option.
It is completely possible to make Easy2D load this font with just code, calling methods to load these two files and passing some configuration parameters to them. But, we will not do it this way: we will use the easier way. We can set all those parameters on a XML file, which Easy2D can parse and then do all the work of loading the font for you. If at any moment you need to change any of these parameters, no recompiling is necessary, just edit the xml and voila, you're done.
Since the documentation for this XML file and all the explanation on how all these files (image, dat and xml) work together is already written, I won't write it again here. Go look at the documentation for the Font class, create the XML file, and then come back here. Don't hurry, I can wait as long as you need. ;-)
If you don't want to go through all the trouble of creating a font, or couldn't figure out how to use F2IBuilder, I've prepared a font for you: get it here. (Remember to unzip it, or else the demo won't work).
Now it's time for some code. Once again, you'll have to create a class inheriting from Implementation. Inside it, create two attributes: one representing a Font, and other representing a Label (we will use the label to blit a text with the font). Here, look at the code:
file game.hpp
#include "easy2d.hpp"

using namespace e2d::core;
using namespace e2d::graphics;

class MyGame: public Implementation
{
private:

   Font* font;
   Label* label;

public:

   MyGame();

   void OnInit(Utilities* Utils);
   bool OnRun(Utilities* Utils);
   void OnQuit(Utilities* Utils);
};
Like before, I'll show you the full code and explain right after. Here it is:
file game.cpp
#include "game.hpp"

using namespace e2d::core;
using namespace e2d::graphics;

MyGame::MyGame()
{
   font = NULL;
   label = NULL;
}


void MyGame::OnInit(Utilities* Utils)
{
   Utils->Video()->Init(320, 240, 24, Video::WINDOWED);

   font = new Font();
   font->Load("MyFont.xml");

   label = new Label(100);
   label->SetFont(font);
   label->SetText("Easy2D can display text\nwith line breaks.\n"
                  "And it formats numbers, see: %d", 2);
   label->SetPosition(20, 50);
}


bool MyGame::OnRun(Utilities* Utils)
{
   label->Blit(Utils->Video()->GetFramebuffer());

   Utils->Video()->SwapBuffers();
   return true;
}


void MyGame::OnQuit(Utilities* Utils)
{
   delete label;
   delete font;

   Utils->Video()->Quit();
}
Methods OnRun and OnQuit, as well as the constructor, are very similar to the last tutorial, so no explanation is needed. Inside method OnInit we are loading the font. Note that all we need is to point the location of the XML file; all of the other configurations are already defined into this file, including the paths to the other two files (the image and the dat). Remember that those paths are always relative to your executable's.
After loading the font, we need to have a message to write with it. That's why we need a Label. This class does not have a default constructor though; the only constructor it provides receives as parameter an integer number that is the size of the char array it allocates. Be careful to do not try to set a message on this label that is bigger than this size, or else an error will occur. Here we set it to 100 to make sure the message will fit into it.
After creating the label, we set a font to it. It is possible to change a label's font as many times as you want, as long as you have loaded every font you need. Then, we set a text to this label. This text can be set the same way as if you were using the world-famous C function "printf": it recognizes line breaks and all kinds of formatting options you already know and love (including floating-point number formatting). Neat, eh?
And, at last, we set the position of the label. This is the position where the label will be blitted on the screen (the position of the label's upper-left corner, that is).
Having all this done, all we need now is a main program to run our demo. I'll put the code here again, but since this never changes, don't expect to see it on the next tutorials. Here it is:
file main.cpp
#include "easy2d.hpp"
#include "game.hpp"

using namespace e2d::core;

int main(int argc, char** argv)
{
GameApplication* app = GameApplication::GetInstance();
MyGame game;

    app->Execute(&game);

    return 0;
}
Compiling and running, the result is gonna be something like this:
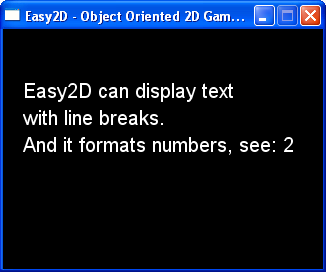
There you go, text on the screen!! =)
I hope this tutorial was useful in some way or another. If you have any questions, feel free to join our mailing list, or post on the forums (all facilites of sourceforge.net). See you next tutorial!